3 Essential Tips for Headshot Portraiture in Natural Light
Portraits. Pictures of people. Portraits have been around long before photography was invented. Lining museum halls and private walls are paintings of people. It has been a long time since portraits were the sole domain of the royals. As technology has advanced, the accessibility of portraiture has progressed to the point where anyone with only a cell phone can take a portrait.
With the popularity of Facebook, Linkedin, and other social networking websites, the images of ourselves that we share with the world have become more visible. The growing use of social networking adds to the importance of the public image we project. Maybe you are not interested in recreating a Rembrandt. You just need a good headshot for an employer’s website. Or maybe you want to update your Facebook or Linkedin profile. Or you have friends who do. Here are some basic tips to help your pictures stand out from the rest.
These 3 tips apply to any portrait. No fancy lighting equipment or expensive camera is necessary. Just that big free light in the sky. These tips will improve your pictures even if you are only using a cell phone camera.
-
Clean background. Clean background. Clean background. This is the single most significant improvement you can make to your portrait photos. Think about what you want behind your subject, then use your feet to move around until you get a reasonably clean and distraction free background. Sometimes this will require moving your subject to a nearby area with less visual distractions. Often it is just a matter of observing the surrounding area and making a creative decision as to what will serve as the best background.
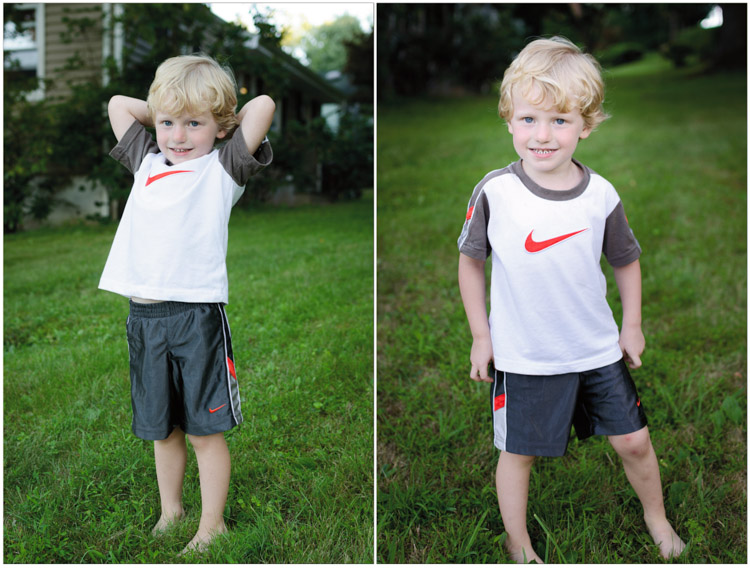
Importance of a Clean Background – Indirect Daylight, South-Facing
The photos above are taken in the same location. In the second photo the camera was moved several feet to the left, removing the house from the background. Busy backgrounds distract the viewer from the intended subject of the photo. Clean backgrounds draw the viewer’s eye straight to your subject. The second photo has a much cleaner background that does not distract, and draws the viewer into the subject.
-
Light. Think about the direction and quality of light. A camera simply records light. If there is poor quality light falling on the subject, the resulting picture will also be poor. To find the best light, first examine your options.
If you are indoors, is there a daylit window available? We want soft diffuse light, so choose a north facing window for indirect light, or a south facing window with a sheer white curtain or bed sheet to diffuse the light if it is sunny outside. Is it cloudy or overcast? In this case, any window will do since the light will be diffused by the clouds. Have your subject stand near the window. Have them face the window, then turn them slightly away from the window and look at how the light falls on their face. Experiment with different angles between your subject and light source and see which looks best.

Indoor – Window Light Portrait – 3 Feet from Window – Window on Camera Right
For outdoor locations, again consider the sky. If it is overcast, the light will be soft and diffused allowing you freedom of location. If it is sunny, look for the soft light offered by a shaded location. Even in the shade, direction of the light source falling on your subject matters. Allow your subject to face straight toward the light source (sun is in the south for the northern hemisphere) and then turn slightly away. Have them make small adjustments and decide which angle looks best.
-
Shoot from eye level. It’s all about the eyes. A headshot relies on a connection with the viewer through the subject’s eyes. Make sure both eyes are in focus! Shooting from eye level allows an immediate connection with the subject as an equal. As a general rule this works best for most subjects, most of the time. This works just as well for children and pets as it does adults.
Eye level establishes perspective. But sometimes we don’t want to see the subject as equal. Shooting from below the subject (looking up at them) can make them look larger than life and more dominant. Shooting from above the subject (looking down on them) can make them look softer and more approachable. This technique of up or down angle can be used creatively to achieve the effect you desire.

Outdoor – Natural Light Headshot – Overcast Sky, Facing East (Southern sun is on camera left)
Equipment used in photographs: